Google AdSense is one of the most popular ways to make money from your website. It allows you to automatically sell space on your website to advertisers and thus earn money from your website.
In this text, we will explain how to correctly add Google AdSense to our WordPress website.
What is Google AdSense
Google AdSense is Google’s advertising network that provides website owners with the opportunity to earn extra money by renting out space on their site. Advertisers have the opportunity to display their ads in that space, and website owners get paid for it.
It works by having Google take care of everything for you. Google administers and manages relationships with advertisers, so you as a website owner have no contact with them.
AdSense offers cost-per-click (CPC) advertising, which means that the site owner earns money every time someone clicks on an ad on your site. Then Google takes its commission from the advertiser, and pays part of the money to the site owner’s account.
The income that a website owner can make varies and depends on several factors. In this text, we will not deal with the commercial aspect of AdSens, but only with its setup.
AdSense registration
In order to use all the advantages of AdSense, you first need to register for a Google AdSense account. You can use your existing Gmail account for this purpose (we assume that you already have a Gmail account).
Once you fill out the online form and send it to the AdSense team, you have to wait for them to review your application. This can take several hours to several weeks for some sites.
Once your application is approved by Google AdSense, log in to your AdSense account and download your ad code. This is the code that you need to put on your website so that it can display ads.
At the beginning of last year, Google AdSense introduced automatic ads, which means that you place a piece of code on your site, and Google automatically decides when, where and how many ads to display on each page.
However, for now, most advertisers still use a manual method to adjust the appearance of ads on pages.
We will explain both methods in this text. To begin with, our recommendation is to start with manual setup. Then when you start making money, then you can start experimenting with auto ads.
Manually placing AdSense ad code on a WordPress site
Click on the Ads menu in the left column, then switch to the By ad unit tab. Now you need to click on Create New Ad .
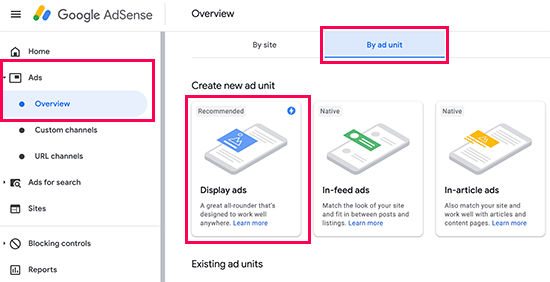
You will need to select the type of advertisement ( ad type ). You can choose between Display ads , In-feed ads and In-article ads . If you are not sure, it is best to start with Display Ads .
Next, you need to enter a name for this ad group and select the size and type of ad.
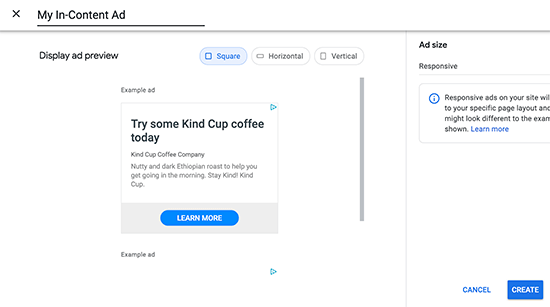
The name of the ad is used for internal purposes only, so you can call it whatever you want.
The next option is to select the size of the ad. Google offers you a large selection of different dimensions, and there is also a list of the most popular dimensions, so you can also choose the desired dimensions that way.
You can also choose whether the ad will be fixed or responsive, which again depends on which devices you want it to be displayed on (mobile / desktop). We recommend that you choose responsive, as it will work well on mobile devices as well.
Now click the Create button to continue.
AdSense will now generate the ad code that you need to place on your site. This code also contains the unique ID of the advertiser.
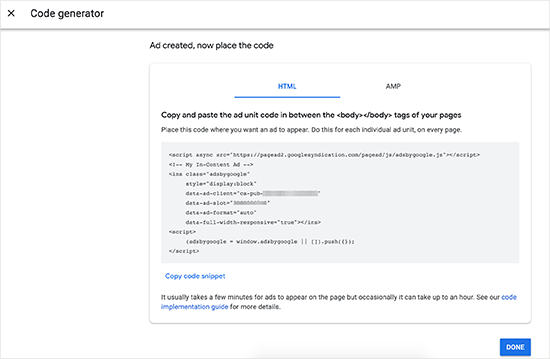
Just copy your code into a simple text editor like Notepad or TextEdit. You will need it in the next step.
Adding Google AdSense to WordPress
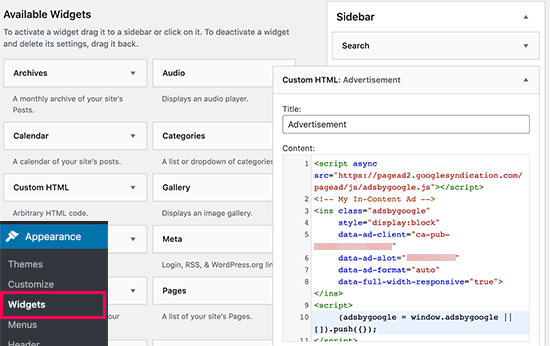
First of all, you need to determine where you want the advertisement to be displayed. Advertisements are most often displayed in the sidebar. , and you can add them using the WordPress widget.
In your Dashboard, go to Appearance→Widgets , then drag the ‘Custom HTML’ widget into the appropriate widget area and paste it there
Automatic placement of the AdSense code on the WordPress site
Adding individual ads to different positions on your site takes much more time. It is not very easy for many new users to determine the best locations for displaying advertisements.
In order to meet users and simplify this process, Google introduced so-called automatic advertisements (auto-ads) . In this way, the user only needs to add one code to his site and let Google AdSense determine where to place which advertisement.
The downside of this method is that the site owner has less control over the position of the ad on his site. If you want to use the option of automatic advertisements on your site, here is how to add Google AdSense to your site.
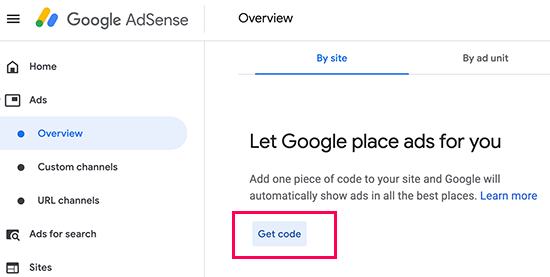
First of all, log in to your Google AdSense account and click on the Ads tab . Now you need to click on the Get Code button to start generating code for automatic ads.
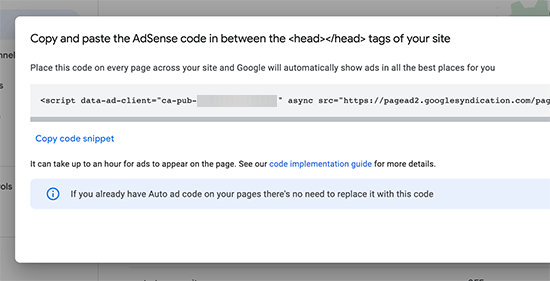
AdSense will generate the code with and display it on the screen. Now you can copy and paste that code into a text editor.
Adding Google AdSense auto-ads code to WordPress site
Auto-ads code uses a single code snippet to generate ads anywhere on your WordPress site. This means that you need to add the code to all the pages where you want your ads to appear.
One way to do this is to add code to the header.php file of your WordPress theme. Read more about how to add the code in our text on the topic of Google Analytics registration.
The downside to this approach is that your code will disappear the first time you update your theme.
That’s why the best way to add code to the entire site is to do it using a plugin called Insert Headers and Footers .
After installing and activating this plugin, go to Settings→Insert Headers and Footers . Now you need to paste your Google AdSense code in the header ( Scripts in Header ).
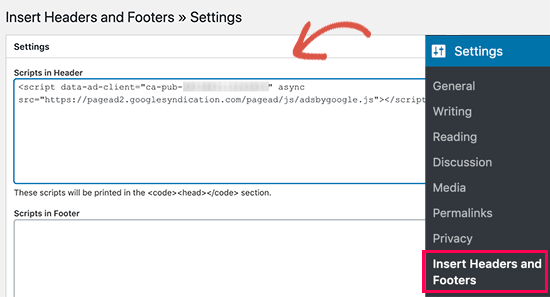
Just don’t forget to click on Save to save the change.
After that, you are ready to start your Google AdSense adventure. Just keep in mind that it takes some time for the ads to start being visible.